Easy to follow and understand
He was easy to follow and understand. He simplified legal terms and definitions so students could understand more easily.
He was easy to follow and understand. He simplified legal terms and definitions so students could understand more easily.
The instructor made a great presentation and kept the class engaged in it as well as discussions
Flawless.
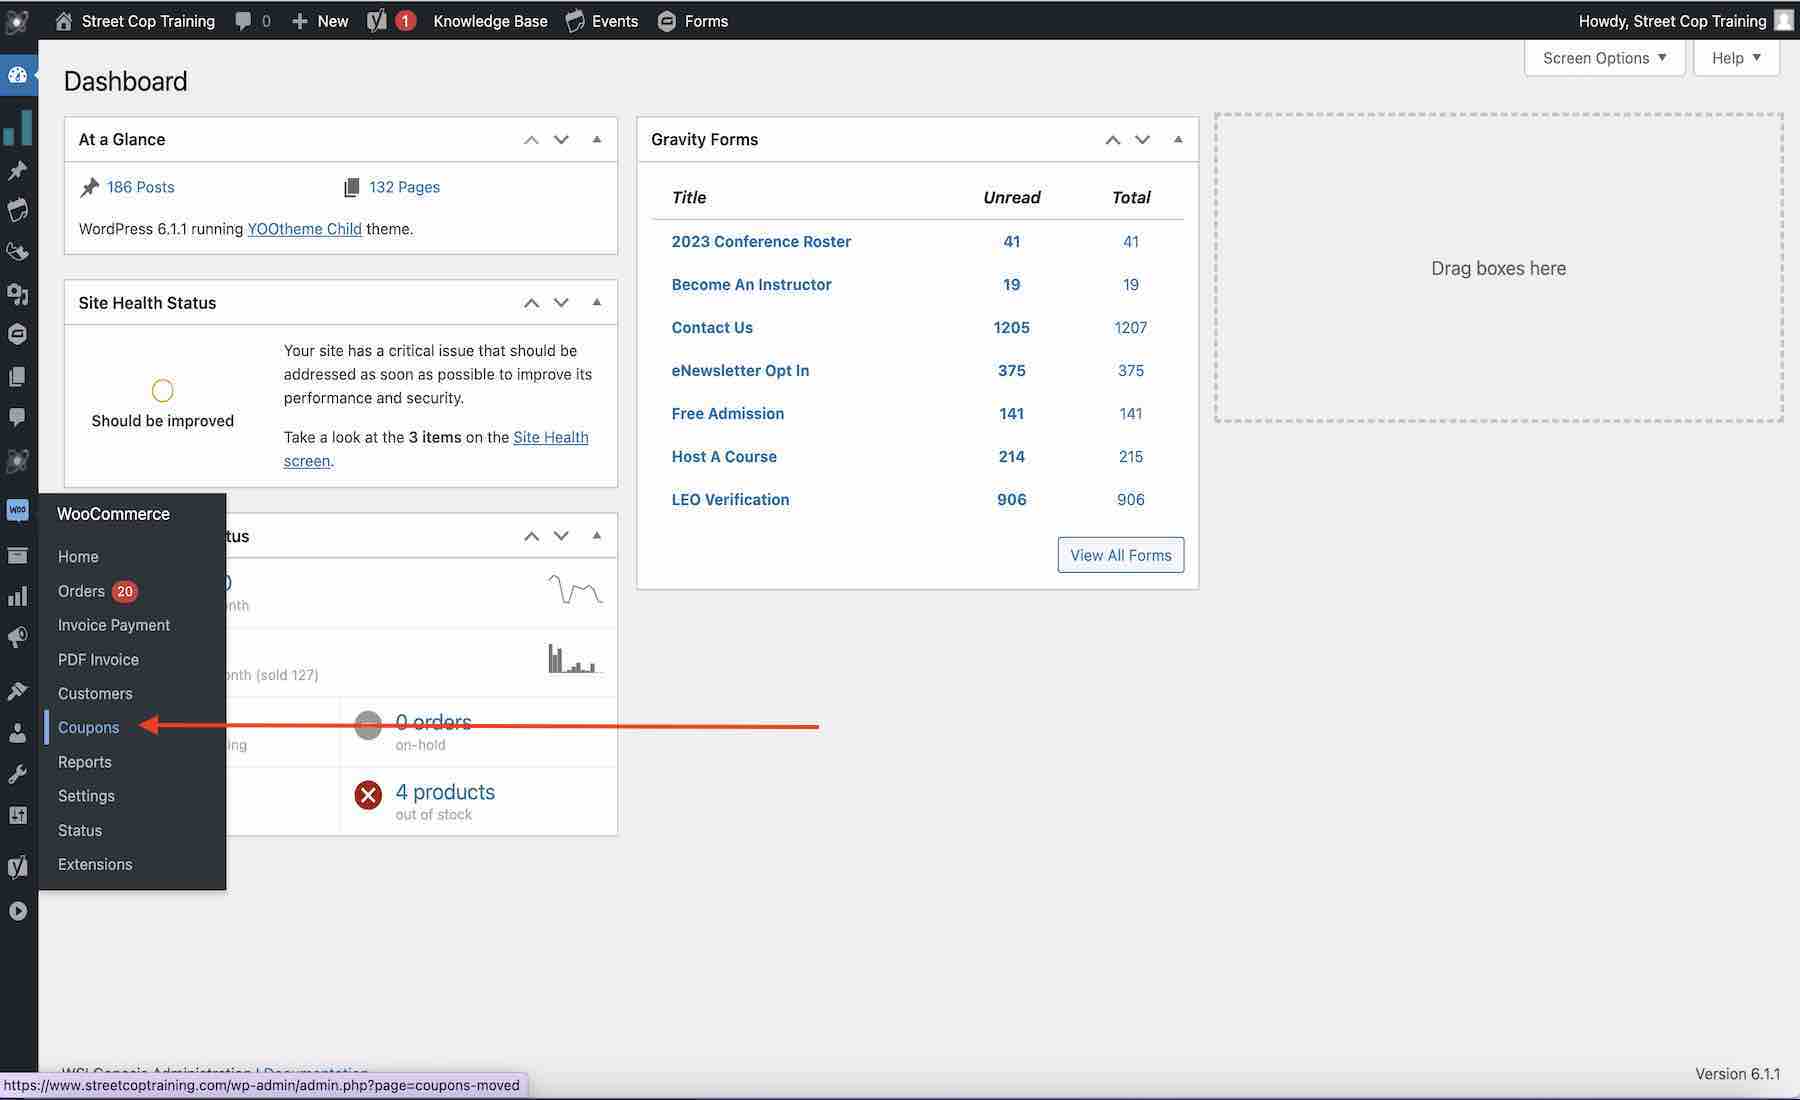
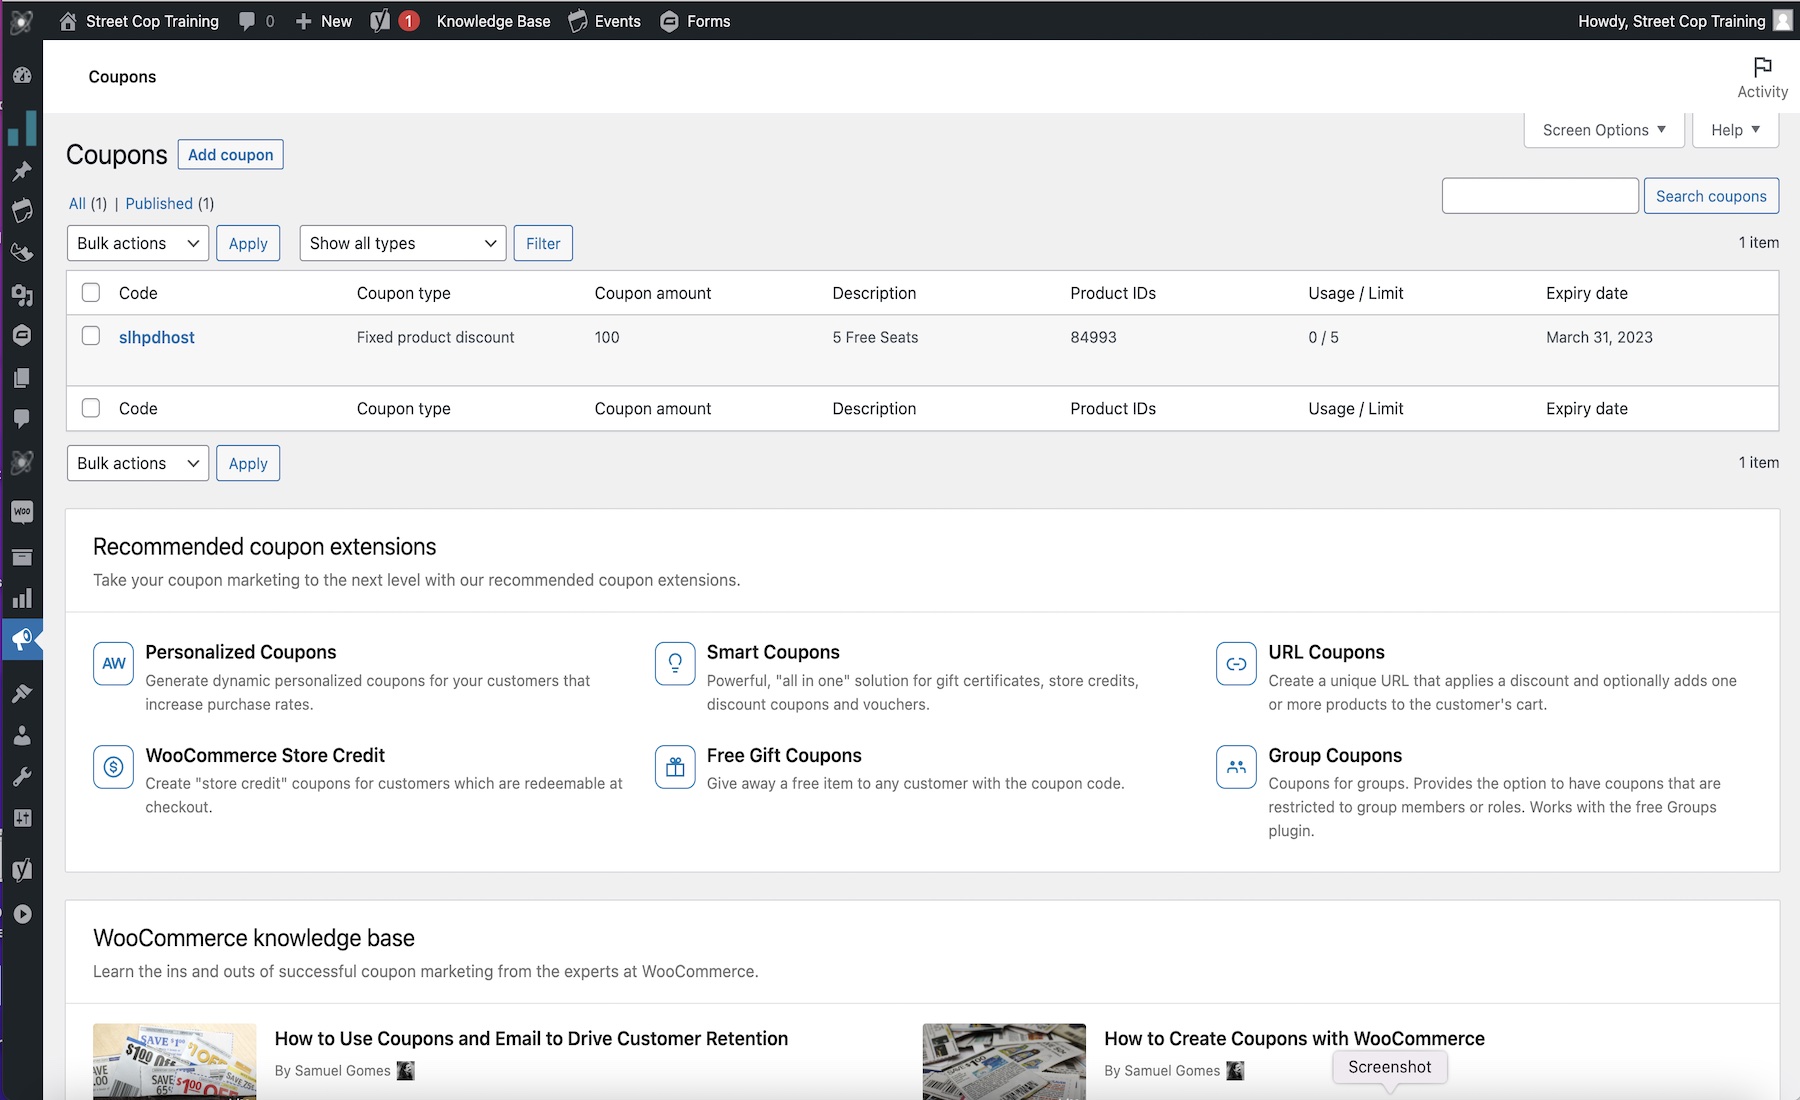
Go to WooCommerce….Coupons
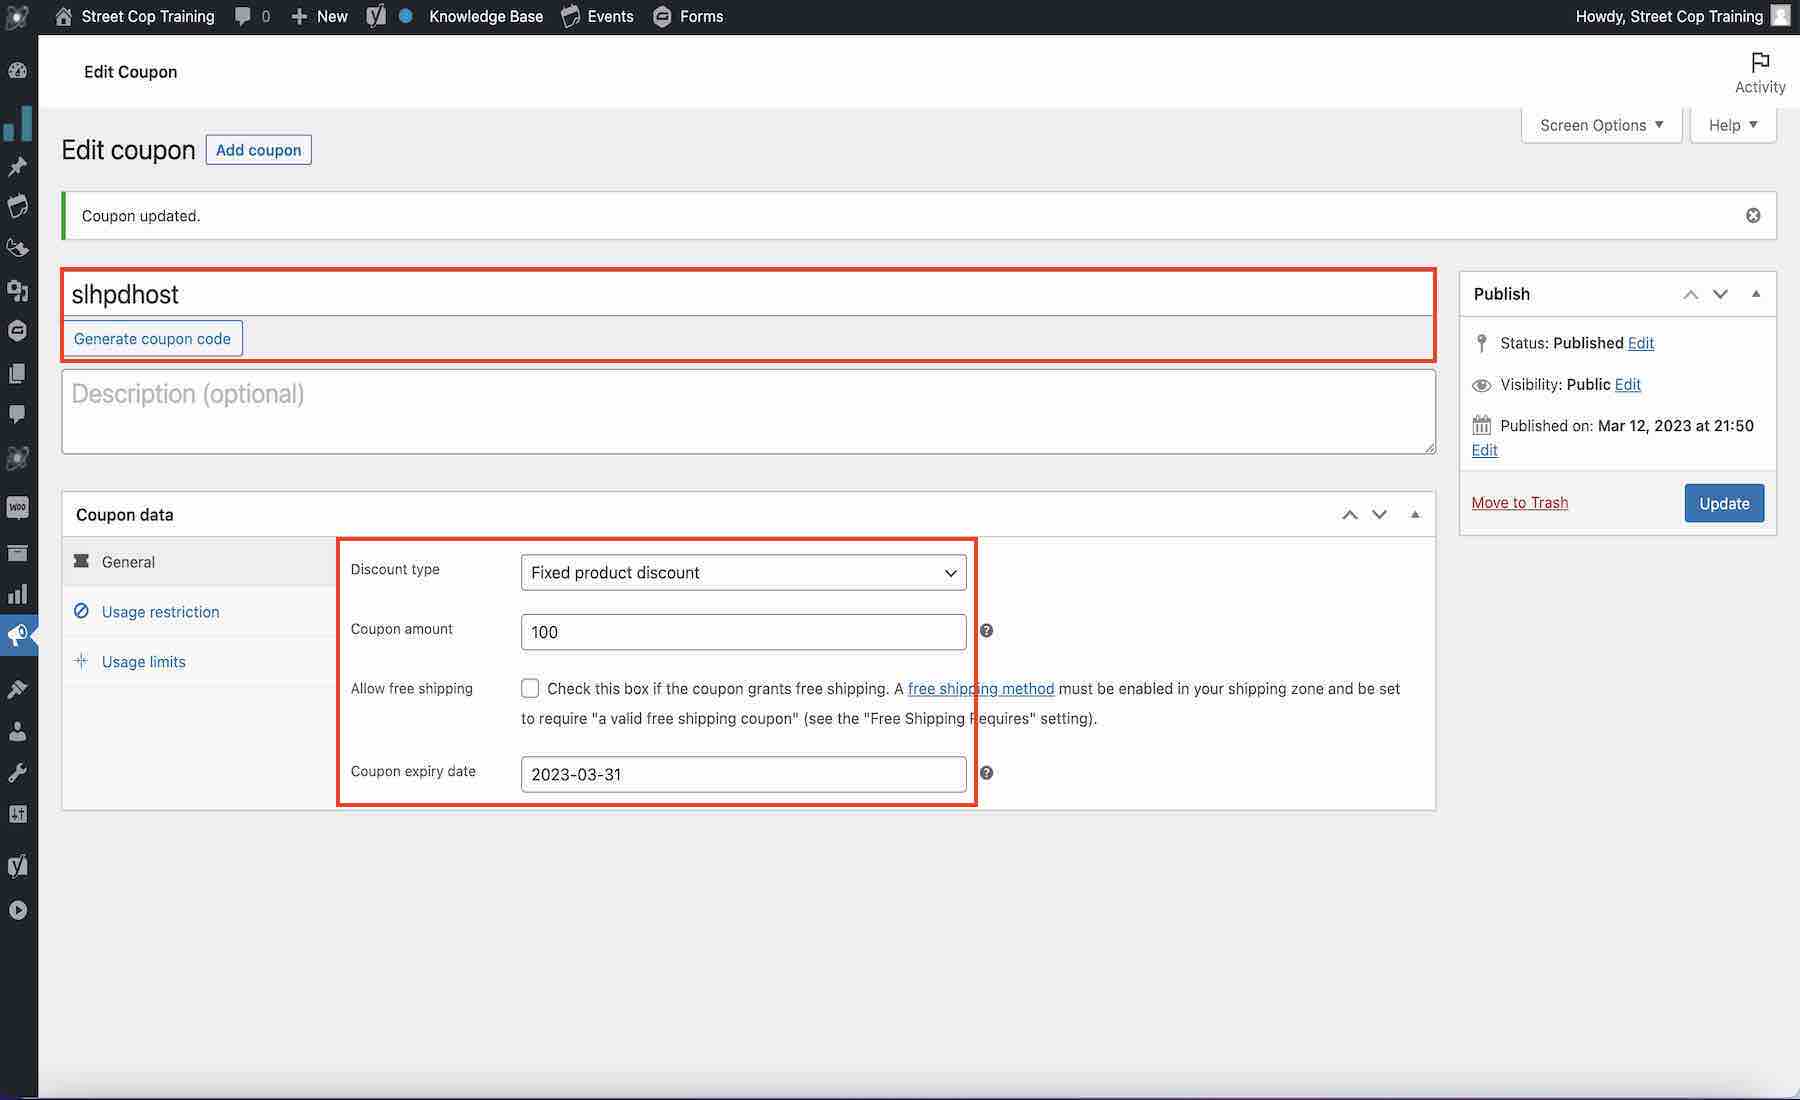
To create a new promotion/coupon code for a Free Class….Enter the code or click on generate coupon code. Adding a short description will help with managing the list of coupon codes.
Select “Fixed Product Discount” from the Discount Type dropdown. Then enter 100% in the Coupon Amount field. Select an expiration date if applicable.
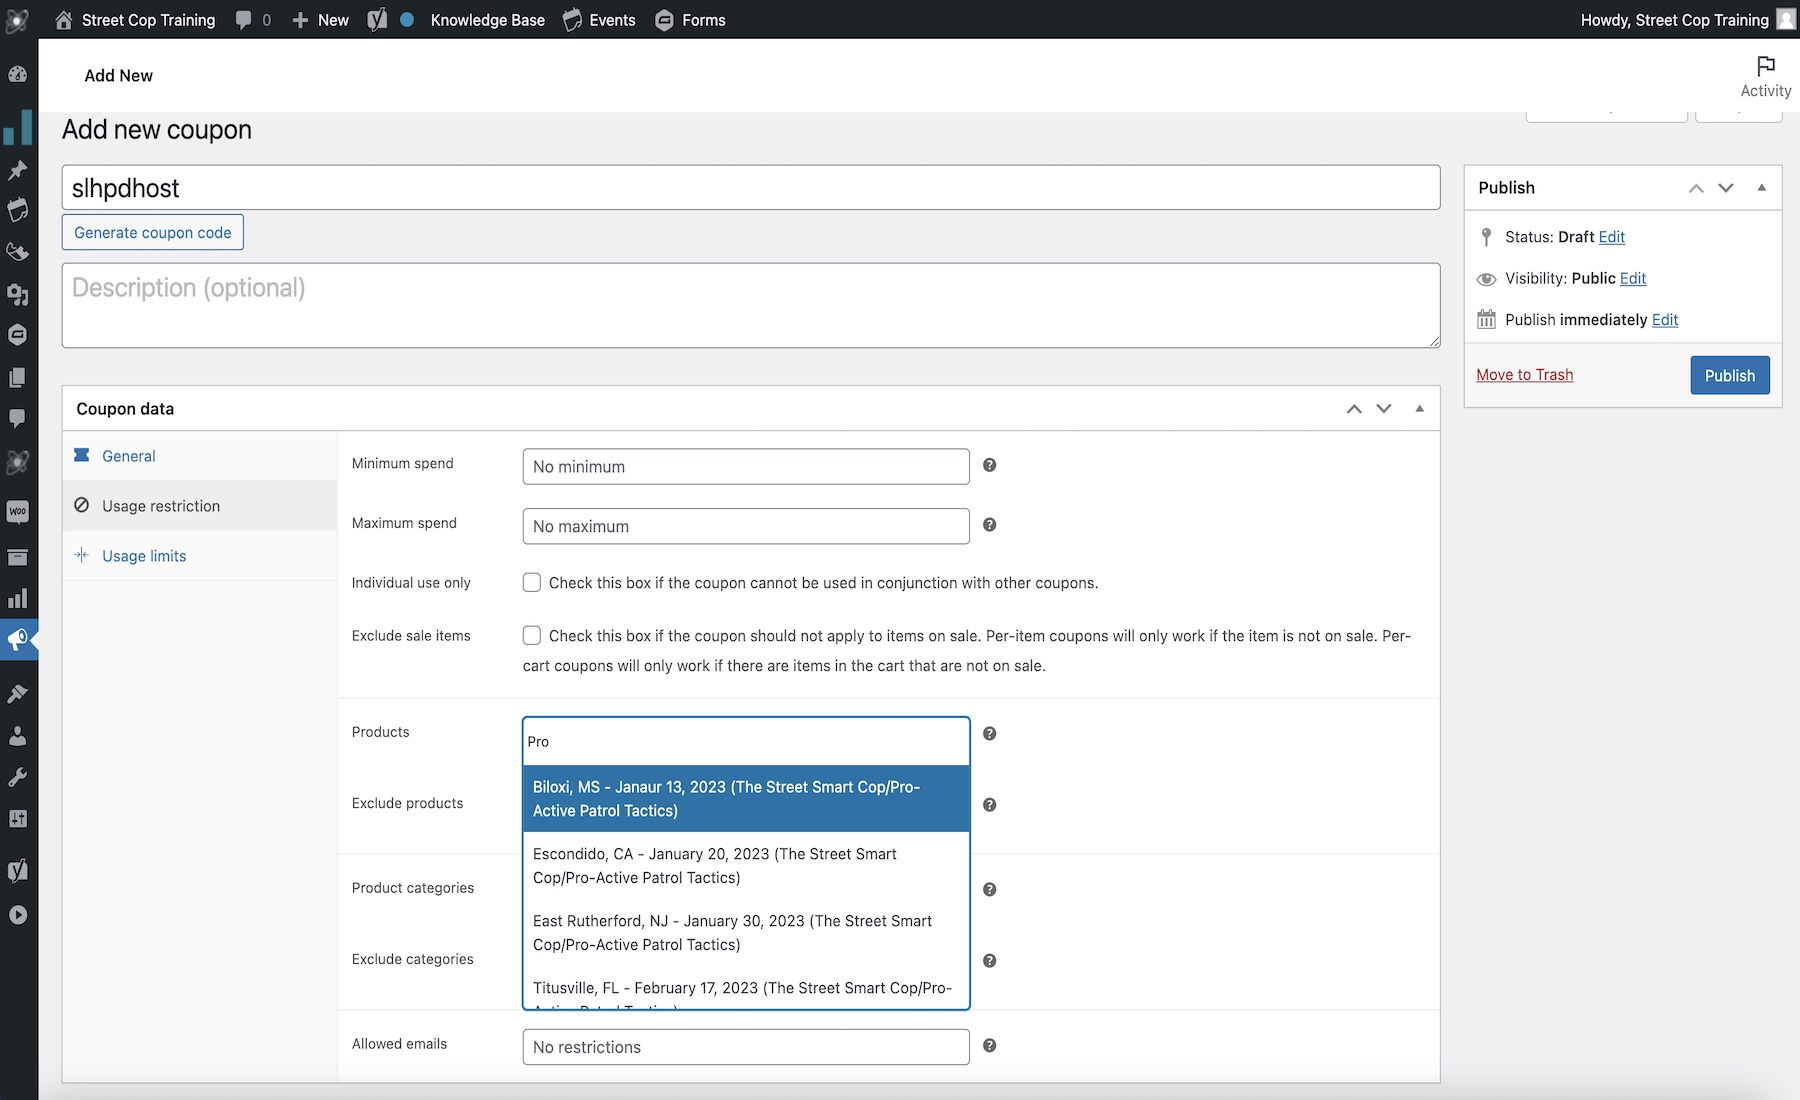
Select the specific class from the product dropdown field or select a product category if the coupon is valid for a specific course and not a specific event.
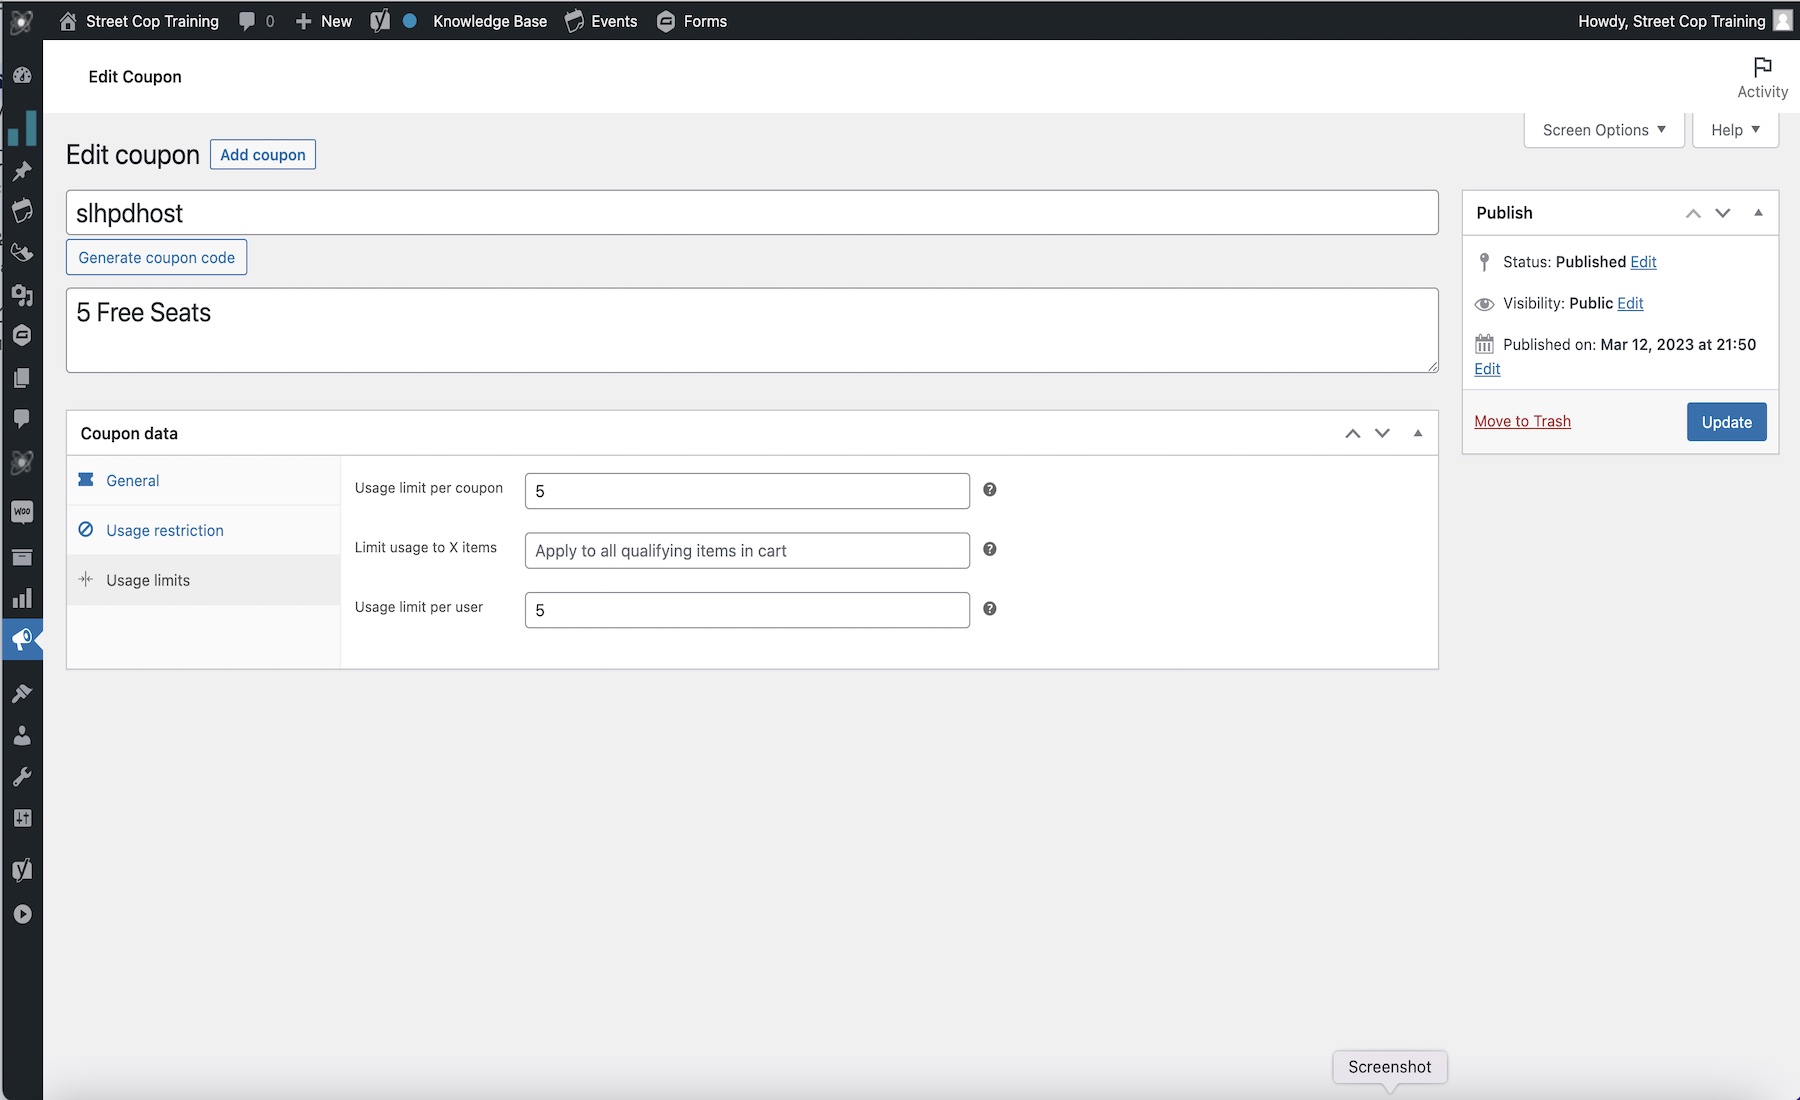
Do not forget to set the usage limits. Click usage limits…set the number of times the coupon can be redeemed. Press Publish or Update.
Your coupon code along with the status will be added to the list.
Navigate to the Event. Find the certificate notes field and type in the note that should appear on the certificate. The pdf certificate can accommodate 2 lines which equates to about 6 lines in the editor.

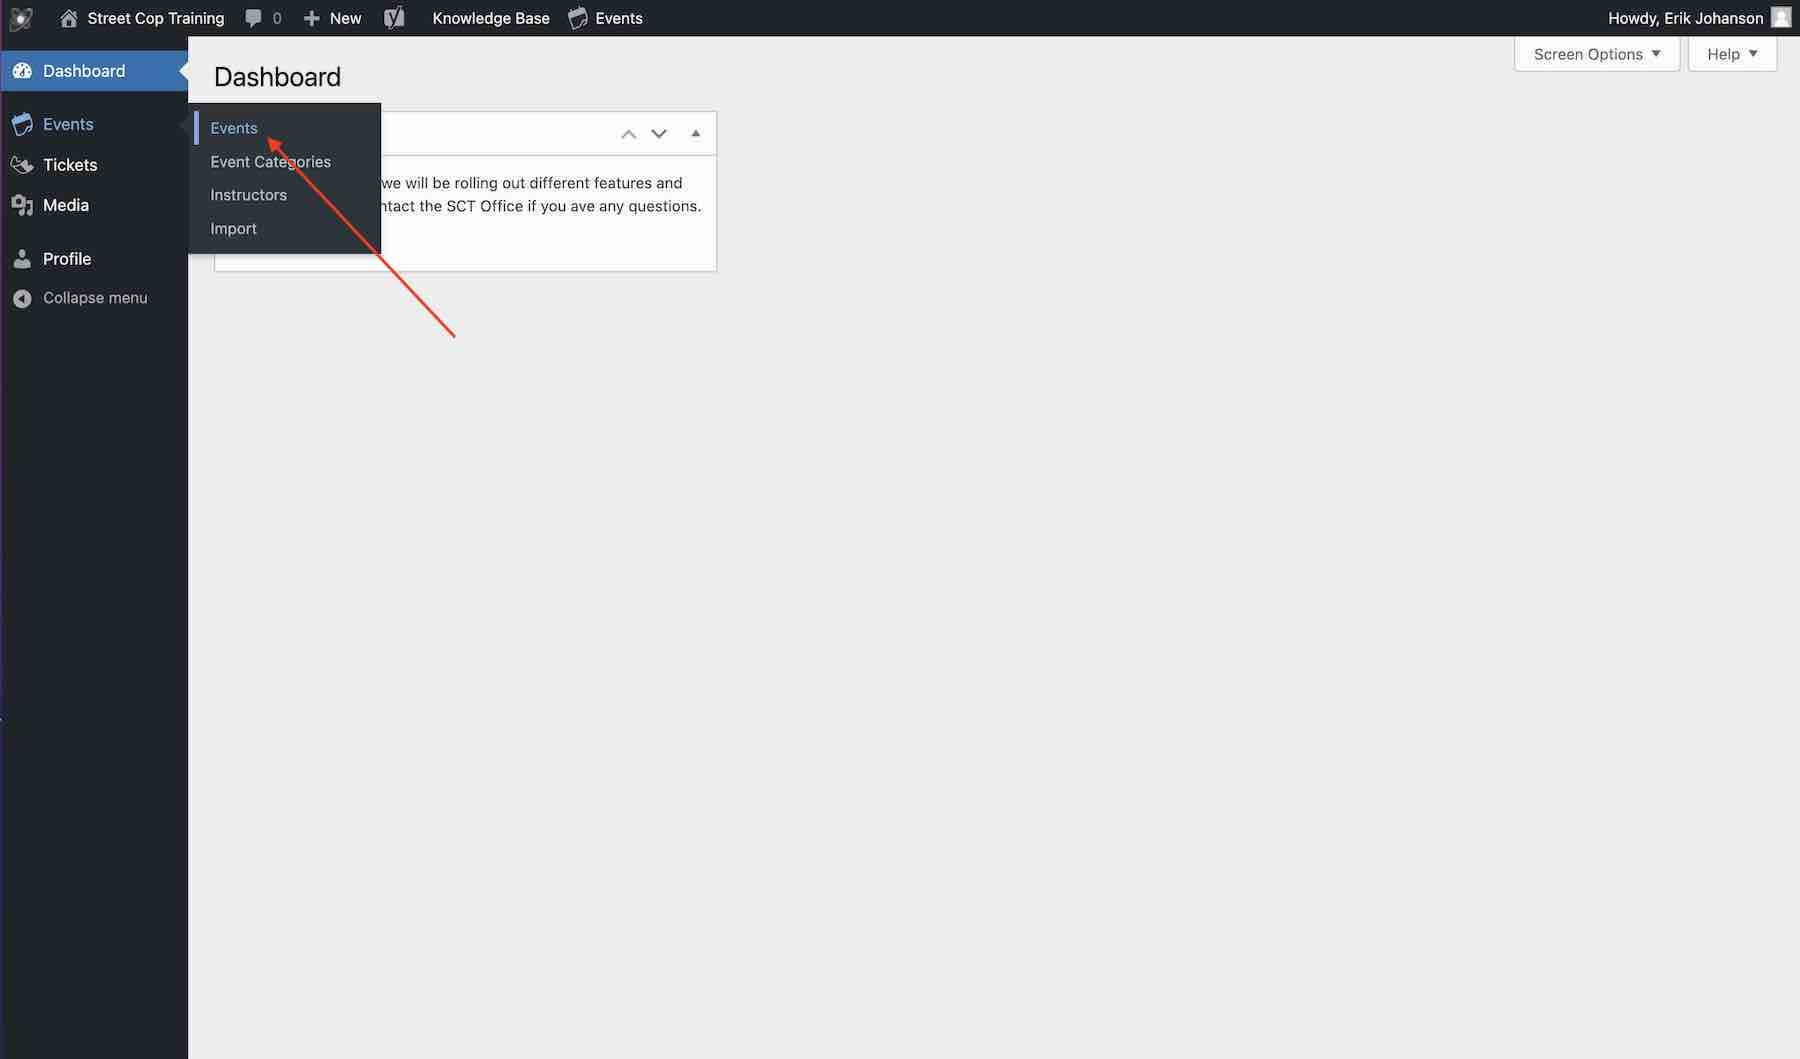
When logged into the dashboard; Go to Events….Instructors.

Find the instructor that you would like to edit, mouse over and press edit.
Note: Instructors will only see their own profle.

Make your edits and then click the blue “Update” button.
Only SCT Administrators should modify the profile images.
Note: Only the instructor information included on the public site will be displayed once edited. As of March 9, 2023 this would include Instructor Bio, Photo, Email, Instagram, TikTok, LinkedIn, and Facebook.
When adding social link please insert the full url; Example; https://www.tiktok.com/@accountname.

To send an individual certificate; Go to the attendee list of the specific event, find the attendee and press “Send Certificate”.
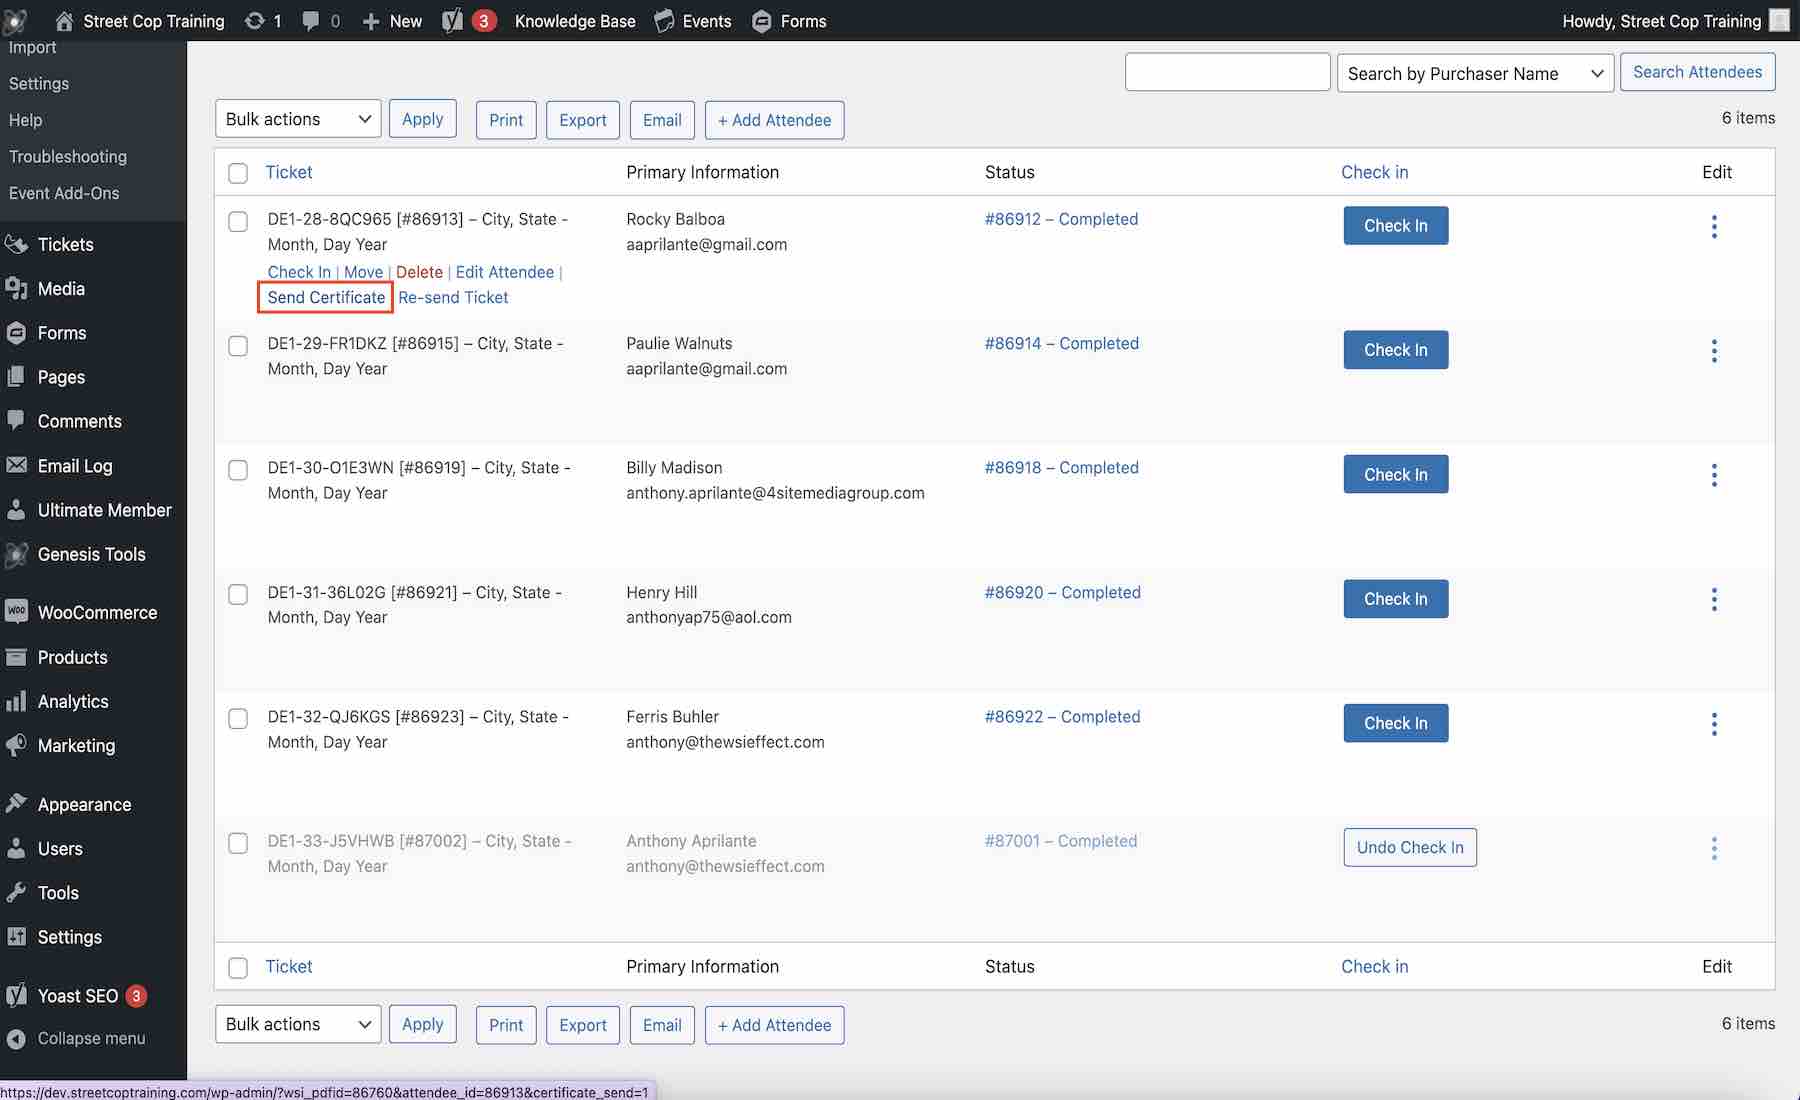
To send multiple certificates at the same time; Go to the attendee list of the specific event, check each attendee who will be receiving a certificate. Select “Send Certificate” from the Bulk Actions dropdown.
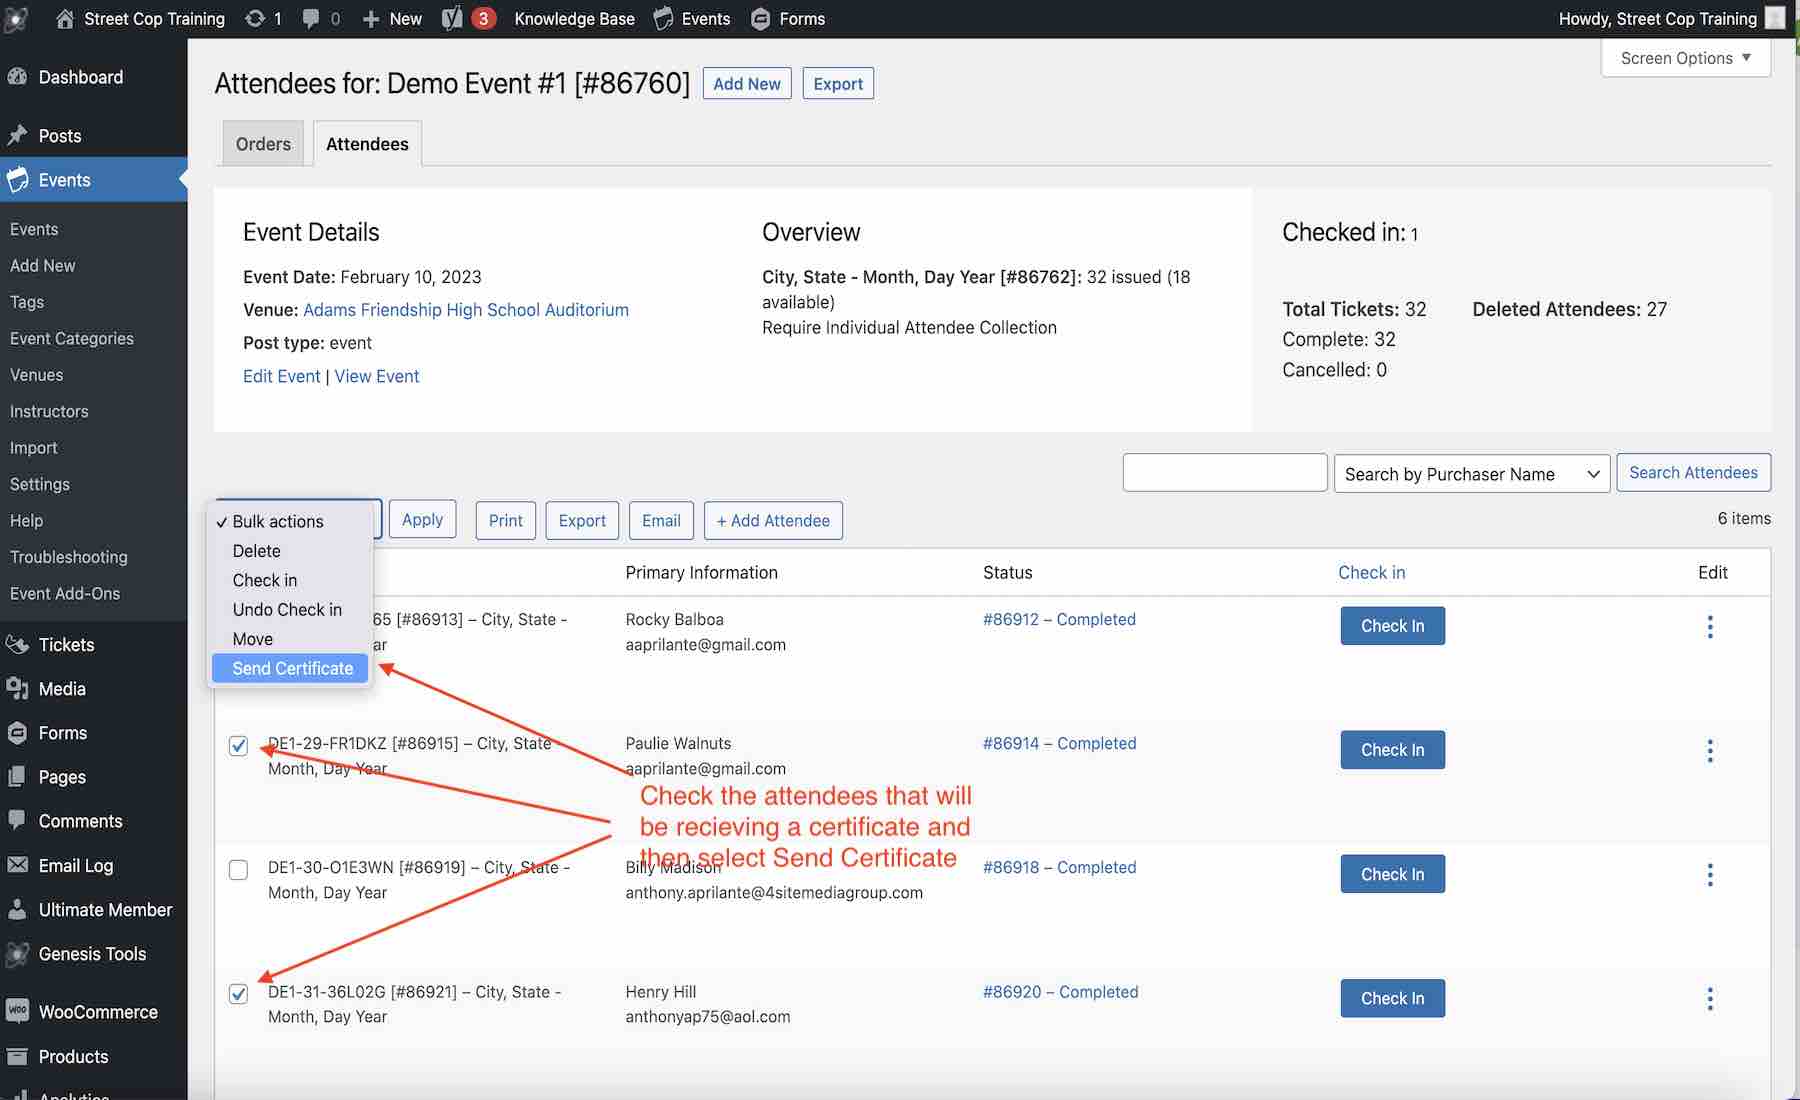
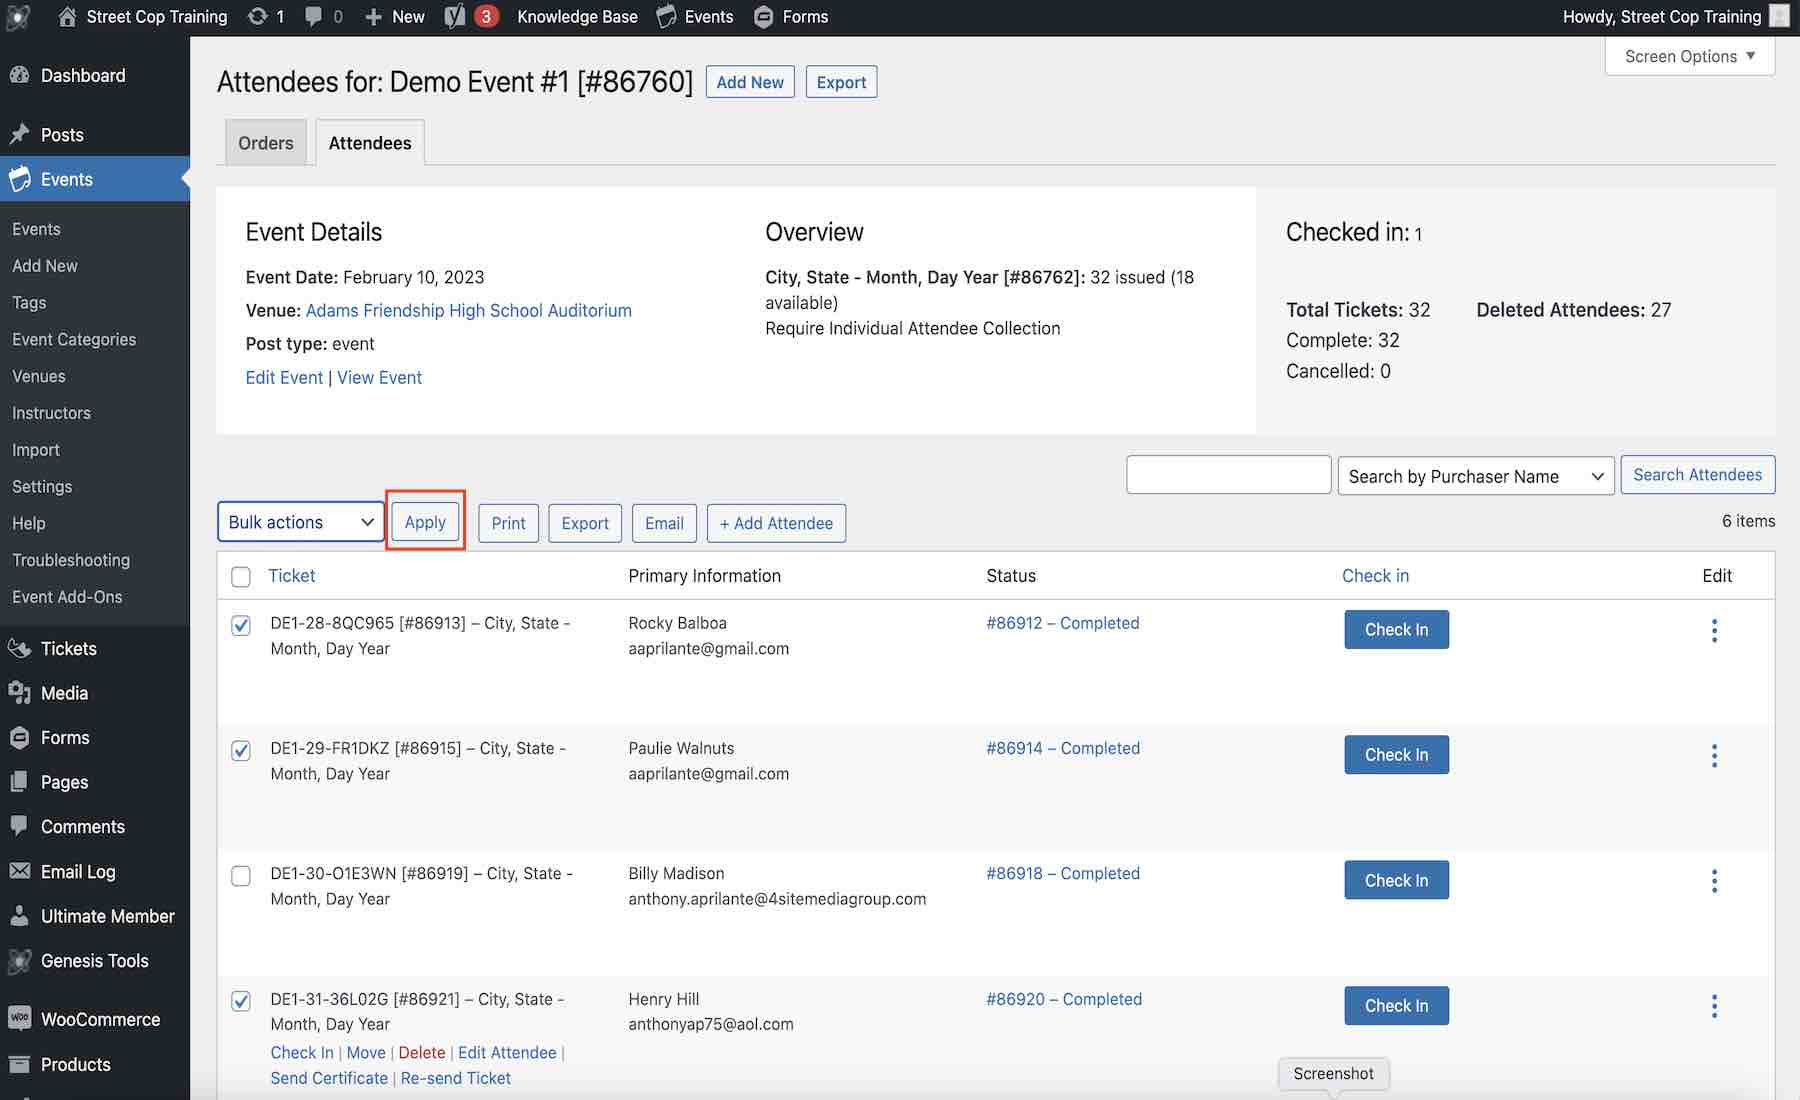
Press the Apply button. Each selected attendee will receive their certificate via email.
Navigate to the list of Events and then select the Add New option or button. Follow the next steps to add a new In-Person Event

Start by adding the event name which would be the name of the course (Ex. Ivory Tower). Then tag the event using the same name as the event. Next select the day and time of the event.
Tip: Copy the event name so you can paste it in various places throughout the process.

Select a venue from the dropdown by typing the venue name into the field. If the venue does not exist in the system you will be prompted to create a new venue.
Select the instructor from the dropdown. If the instructor does not exist you will be prompted to create a new instructor.

Categorize the event by checking the Name, In Person and “Course” with the name as the primary category.
Tip: Whatever category you select first will be the primary. This will eliminate the need to go back and assign the primary to the course name.
Now that you added the event the next part of the process will be to create the tickets that will be sold for this specific event.
Click the New Ticket button.

Ticket Type is extremely important as it will be used for all sales and tracking. The ticket type should include the location and date formatted the same way:
East Windsor, NJ – January 1, 2023
Set the price to $0.00 and enter the capacity.

Next enter the SKU, which will be the event name. Then under Attendee Information select the In Person from the field set dropdown.
PRESS SAVE TICKET – The ticket will be saved
PRESS PUBLISH – The Event will be published

In the dashboard navigation go to Products….All Products. You will notice that all of the tickets that you created are automatically listed her. If the ticket type was entered correctly they will all look nice and uniform.
Find the ticket by browsing through numerous pages or by entering the event name in the Search Products field. This field will be pulling from the SKU.
Mouse over the product that you are looking for and press Quick Edit.

Copy the event name into the Featured Tag field and check three categories; “Course”, In Person and the Name.
Press Update
Your event is now active and the ticket is ready to be sold online.

Download the Event Tickets Plus App.
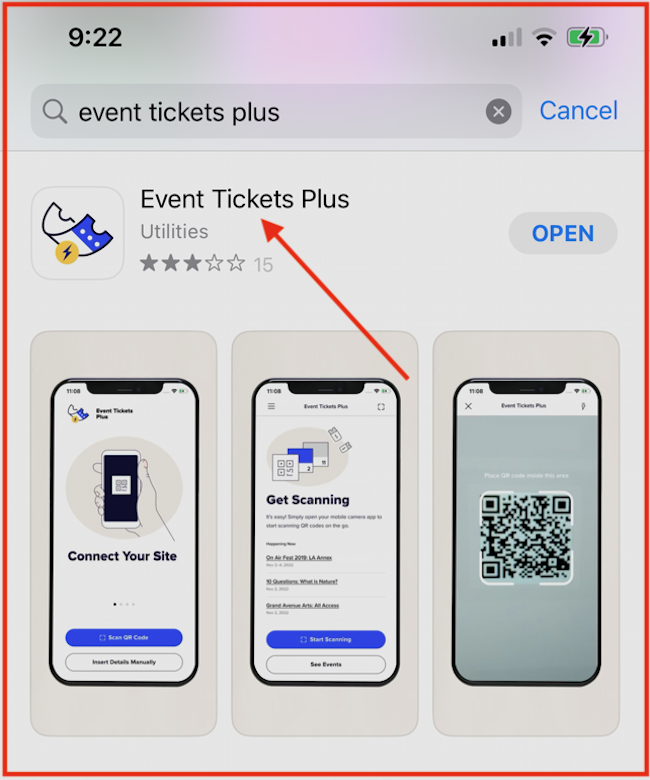
Connect the App by scanning the QR Code in the website dashboard or by inserting the details manually, see next step.
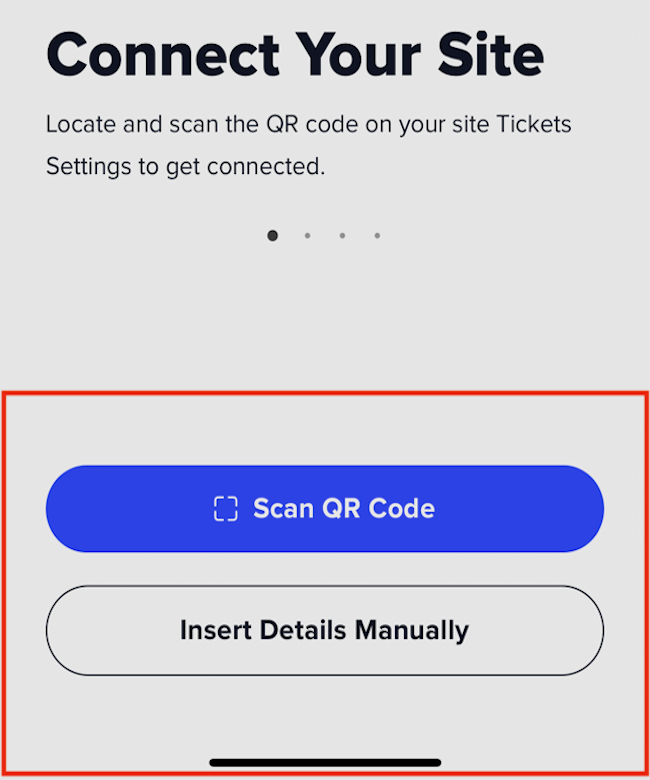
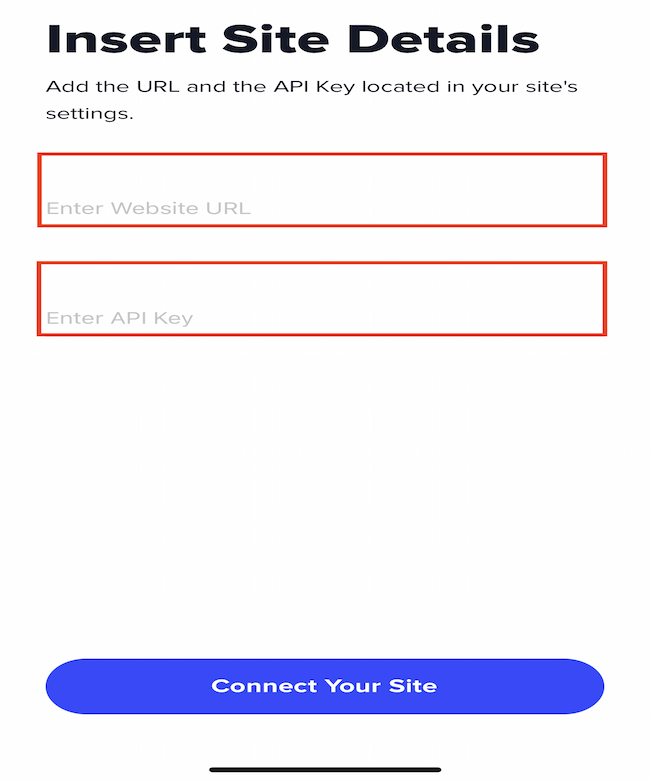
If you opted to Insert Details Manually use the following credentials:
Website: https://www.streetcoptraining.com
API Key: 75b83fc8
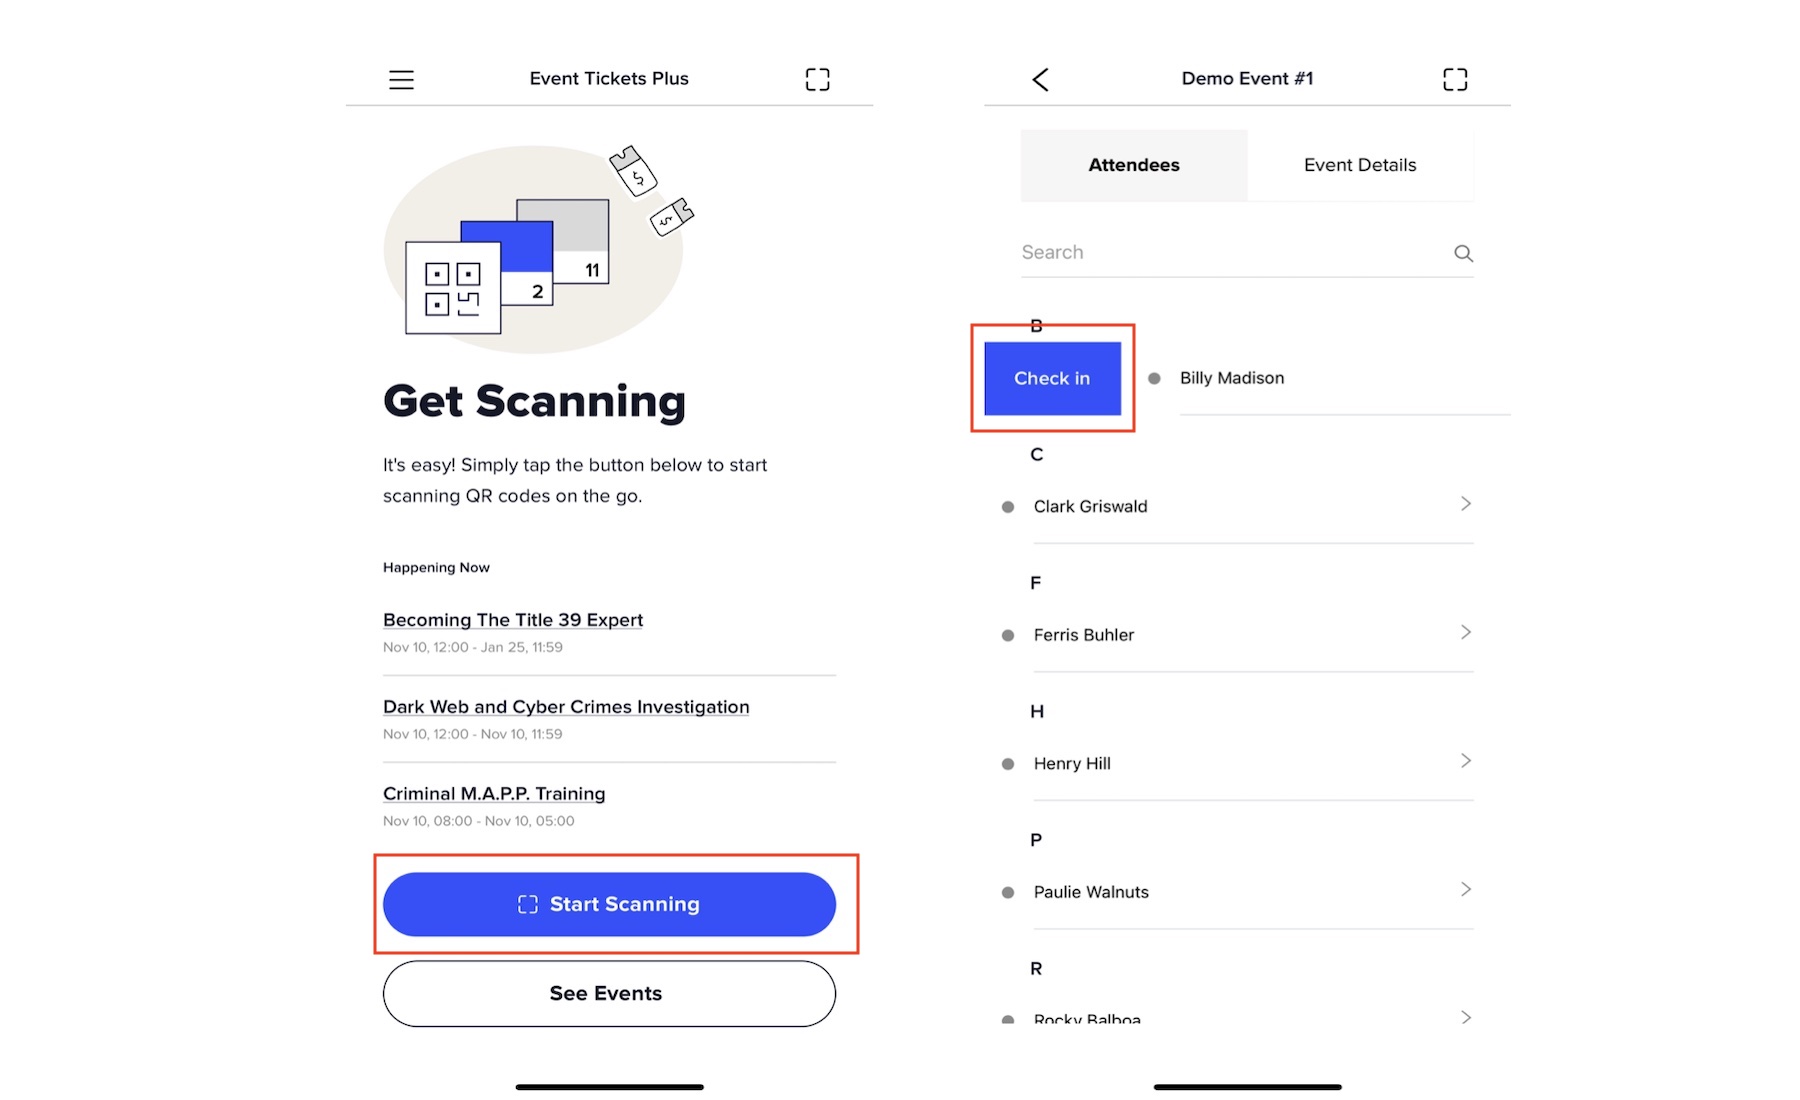
Press start scanning to check in attendees with a QR Code. Or find the class to view the rooster and press the Check In button next to the attendee’s name.
Navigate to the list of Events and then select the Add New option or button. Follow the next steps to add a new On Demand Class.
Start by adding the course name and the course description. Next select the day and time of the event but unlike a typical in person class set the end date out 10 years. Select the instructor from the author drop down.
Tip: Copy the event name so you can paste it in various places throughout the process.
Tip: Clean the description text before pasting it into the site. You should only paste raw text.

Select the instructor from the dropdown. If the instructor does not exist you will be prompted to create a new instructor.
Set the featured image.
Categorize the event by checking the Name, On Demand and “Course” with the name as the primary category.

Tag the event using the Course name. There is no need to set a venue.
Now that you added the event the next part of the process will be to create the tickets that will be sold for this specific event.
Click the New Ticket button.
The ticket type for On Demand Courses should be On Demand. Then enter the price and keep the capacity set to unlimited. Next enter the SKU, which will be the course name.
In the Event Options block check Hide From Event Listings.

Then under Attendee Information select the On Demand from the field set dropdown.
PRESS SAVE TICKET – The ticket will be saved
PRESS PUBLISH – The Event will be published
In the dashboard navigation go to Products….All Products.
Find the ticket by browsing through numerous pages or by entering the event name in the Search Products field. This field will be pulling from the SKU.
Mouse over the product that you are looking for and press Quick Edit.
Copy the event name into the Featured Tag field and check three categories; “Course”, On Demand and the Name.
Press Update…..Your event is now active and the ticket is ready to be sold online.
In the left navigation click on Events. You should see all of your events listed.
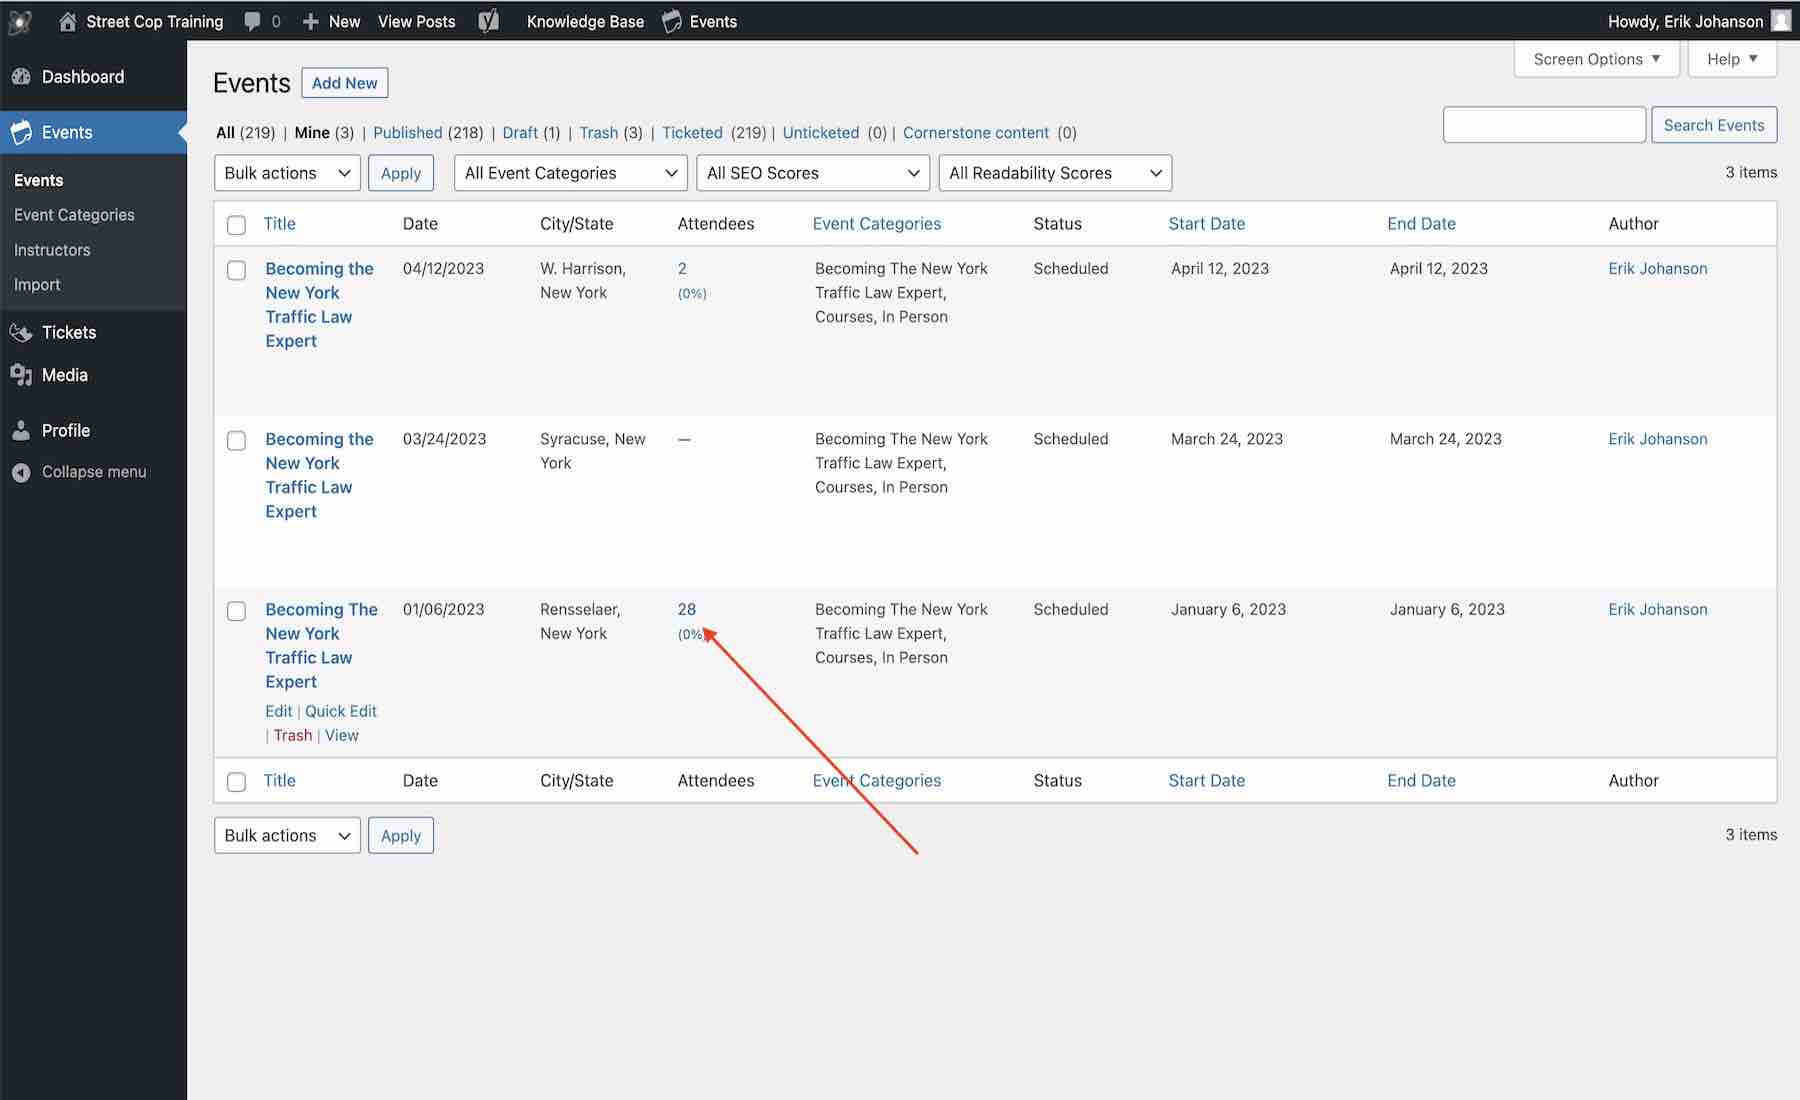
Locate the event and press the number in the Attendee column to view all registered attendees.
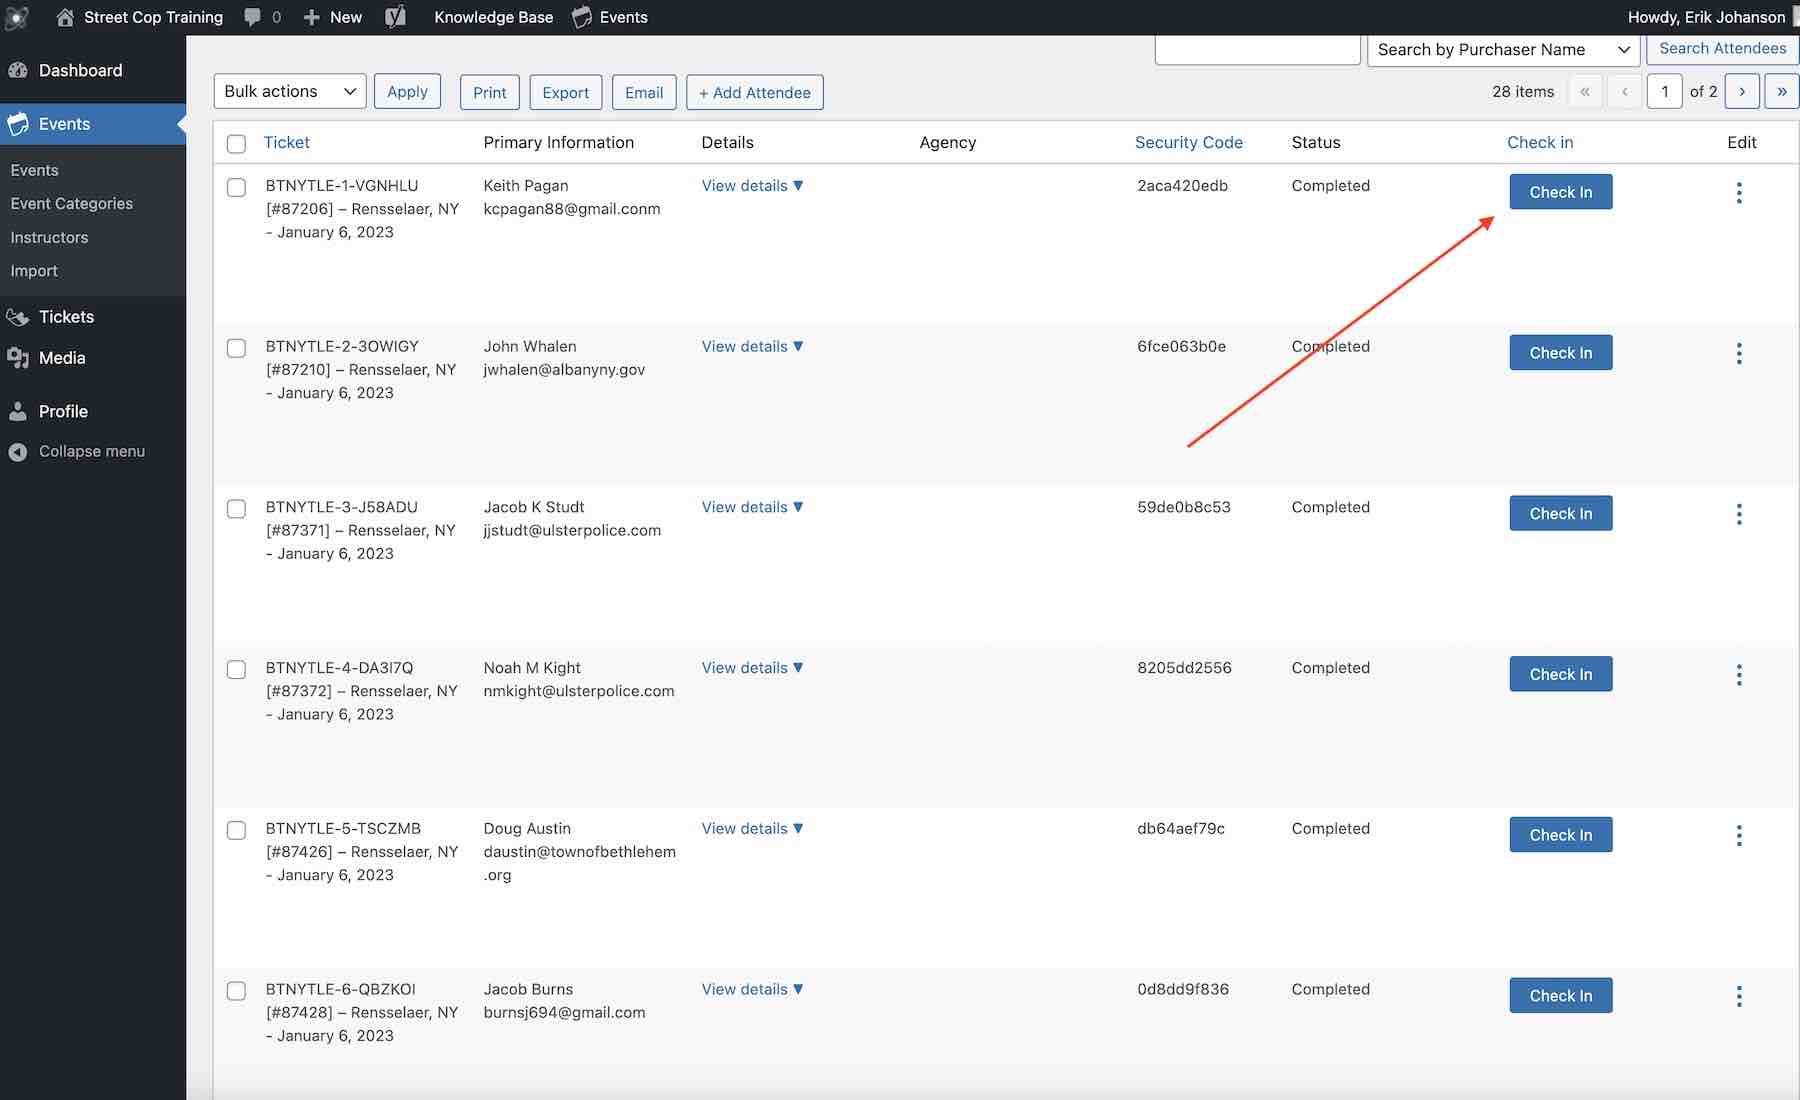
Find the attendee in the list by scrolling through or searching by name using the Attendee Search feature in the upper right side of the screen. Click on the blue Check In button when the attendee has been verified.
Go to the class roster and press the Add Attendee button. A short form will open in light box view.

Add the attendee’s information into the form and press the Add Attendee button. If you do not have the phone number use 111-111-1111. If you do not have the agency use SCT.
